How in the heck am I going to figure out how to use this product? I started by browsing youtube tutorials and postings by others to get an understanding of it. I could not find a comprehensive tutorial that walked my through from start to finish on how to build a simple website. So I decided to share what I have learned, as I learn it.
I purchased Adobe Dreamweaver CS5. However, if you are wondering if this is the right product for you, you can download a free 30-day trial from Adobe. www.adobe.com/go/trydreamweaver/
Overview: I am going to create a simple 4-page site using the HTML template provided in Dreamweaver. Before I can do this, I have to create a new "site" location somewhere on my computer.
My first test site will showcase my hobby of making wedding cakes on the side. I will call it TexArtisan Cakes.
(Double-click images to make them bigger.)
Here are my first steps after opening Dreamweaver:
- From the menubar, click site, new site. A pop-up window will appear. In the site name, type in your site name, in my case it is TexArtisan Cakes. In the site location, create a folder on the local computer and also title it your site name, in my case it is TexArtisan Cakes. (see figures 1.0 and 1.1)
- To keep the file structure nice and tidy, create two folders within your site file structure and name one Html and one Images. (see figure 1.2)
Figure 1.0
Figure 1.1
Figure 1.2
Lesson 2
How to create your first webpage:
- From the menubar, go to file, new.
- A pop-up will open. Select HTML, 2 column fixed left sidebar, header and footer. Then click Create. (see figure 2.0)
- Once the file is open save as index.html in your TexArtisan Cakes/HTML folder.
- Your screen should look something like figure 2.1. Notice on the bottom right your file structure is indicated as your Site Name with HTML and Images underneath.
Figure 2.0
Figure 2.1
Lesson 3
How to use Adobe Kuler to create your color scheme:
- Go to http://kuler.adobe.com/#create/fromanimage
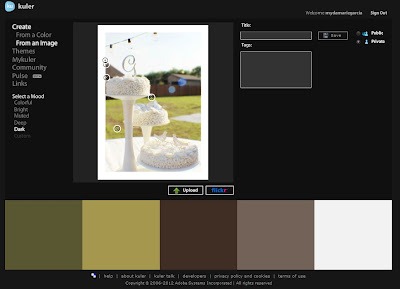
- Upload the image you are choosing to use for your logo. In my case, my color scheme will come from a picture of a wedding cake.(see figure 3.0)
- Once you have selected your complimentary color scheme, save your scheme, and download it as an Adobe Swatch Exchange or ase. For example, I named my color scheme weddingbliss.ase.
- You can use the colors as a reference for a general idea, or you can get the actual name of the colors by opening it in Adobe Photoshop and loading your swatches in the color palette. (see figures 3.1 and 3.2)
Figure 3.0
Figure 3.1
Figure 3.2


No comments:
Post a Comment